Marble on Rails
About

Marble on Rails
Views: 51
Share Page
Game Description
How to play
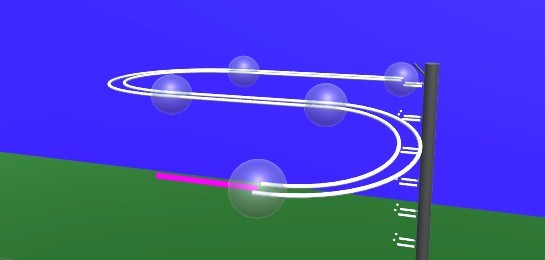
'Marble on Rails' is a marble run simulation application.The application has two modes: View Mode and Edit Mode.
View Mode
In View Mode, you can view the behavior of the courses you have created so far and sample courses.The viewpoint can be switched using the buttons, and the marbles to be gazed at can be changed. You can change the camera direction by dragging the screen with the mouse.
You can use the keyboard (WSADQE, cursor keys) to move the viewpoint as desired.
The drawer menu is displayed by pressing the hamburger button in the upper left corner. You can change some settings and modes, and exit the application.
Keyboard Shortcuts in View Mode
1-5 Camera Switching. Fixed camera to be set when editing course.6 Ball tracking side angle camera. operated by WS, cursor keys.
7 Ball tracking rear angle camera, operated with WS and cursor keys.
8 Rotational camera.
0 Fixed camera, ball tracking. With zoom. Zoom size can be changed with up/down cursor keys.
V Switch camera in sequence.
B Switching the ball in focus
M Toggle on-screen button display
R Ball reset
Period(.) Random camera switching mode.
Edit Mode
You can create your own courses.The rails are placed and edited in the same way as in drawing software. Smooth rails can be generated by setting anchor points and control points in space.
Anchor points can be placed within the white line drawn on the ground in the edit screen.
There are several states in the edit mode.
Add:
Press the + button to add a rail with a preset shape, such as straight, curved, or looped.
A pink bar is displayed at the position to be added. If there are multiple positions to which rails can be added, press the Add button again to change the add position.
You can delete the anchor point at the position of the pink bar by pressing the Del key.
If there are no more positions to add (all rails are connected to the elevator), this state will no longer be selectable.
If you want to delete a connection to the elevator, put the point of connection to the elevator in Edit state and select "Disconnect from elevator".
Edit:
The anchor point of the rail is displayed as a gray sphere.

Click on the sphere to enter anchor point edit mode.

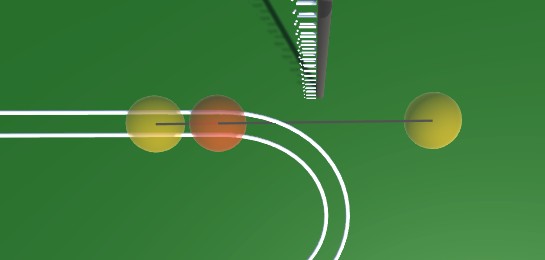
Anchor points are displayed as red spheres and Bezier curve control points as yellow spheres.
Each sphere can be moved by dragging.
The bank angle of the rail can be edited in the window displayed on the right.
Cam:
You can edit up to five camera positions to be used in View Mode.
Use the buttons in the lower right corner to switch camera numbers and move the camera with the mouse or keyboard (WSADQE).
About the viewpoint
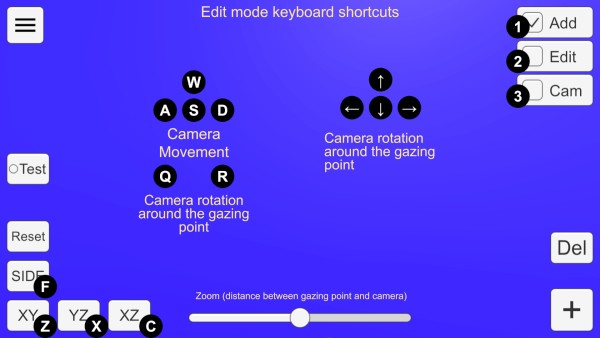
The 'XY', 'YZ', 'XZ', 'SIDE', and 'Reset' buttons in the lower left corner and the seek bar for zoom control the viewpoint.Press 'XY', 'YZ', and 'SIDE' twice to get the view from the back side.
The Bezier curve control points move on the visible plane when editing, so proper viewpoint switching is necessary. XZ' or 'SIDE' is recommended.
About the Elevator
In Edit mode, select the center sphere of the elevator to open the elevator setting window.In this state, it can be moved by dragging. From the side panel, you can select the direction of ejection, height, and three-way.
Connecting to an Elevator
Selecting 'Enter Elevator' in Add mode adds a straight line connecting the current position to the nearest elevator point.In order to successfully return the ball to the elevator, the rail must be connected to the elevator and the ball must be controlled to roll in the direction of the elevator.
Mouse Controls
Drag to move the ball parallel to the screen.Right-click and drag to rotate around the gazing point. If there is no gazing point, rotate the camera.
Keyboard shortcuts
Escape key cancels a dialog or opens a drawer menu.See below for shortcuts when in edit mode.

Miscellaneous
You can run Marble for testing by checking the Test checkbox.Steam Workshop
You can share the courses you have created.Uploading is available from the Edit Mode menu. You can upload the course you are currently editing. Tapping the notification that the upload is complete will open the Steam item page. The preview image will use the camera setting Cam1.
If you want to view a course shared in the workshop on your own computer, you can subscribe to it on the Steam Workshop. The subscribed courses will be downloaded automatically. You can select the downloaded course from the "Steam Workshop" menu in View Mode.
Differences from the Android version
Compared to the Android version, the accuracy of physics calculation has been improved. This allows Marble to run more smoothly.Shadows are drawn
Elevator three-way support
Announcements
1.0.3 (20221024)
Keyboard shortcut for gazing at the ball is changed to 0.Toggle gazing at the ball by pressing the 0 key.Fix/unfix next point when editing control points.Changed the button for adding parts in edit m
1.0.4 (20221106)
A camera that rotates around the course has been added (8 keys).Add camera auto-switching mode (period (.) key) key)Course is drawn on the title screen.Fixed some bugs in editing.
1.0.2(20220920)
Steam Workshop supportAdded keyboard shortcut for switching camera in View ModeAdded a camera to view the ball from a fixed point.Fixed a bug that sound does not work in View Mode.
update 1.0.1
Font changes. Addition of Japanese. Addition of setting dialog.Removed flickering when riding in an elevator.Side view and backward view in View Mode can be operated.(W,S key and cursor key).Changed


